Reverse Engineering Prince of Persia on Apple II
I tried to reverse engineer the original code of Prince of Persia on Apple II, for some of it's parts, which was quiet interesting!

I tried to reverse engineer the code of Prince of Persia for some of it's parts, which was quiet interesting!
I came along to dive deeper into this when I was in contact with Golo Roden from the native web, who ask me if I would be interested in presenting this code on a live stream on YouTube.
It was a fascinating experience to dive into the world of 6502 Assembly, that mythical game and the game development back in the 80s. Reading the source allowed me to unterstand how much work and knowledge went into it and it shows me how grateful we can be for the things we take for granted today.
Acknowledgment
First of all - I would like to thank Jordan Mechner for providing that amazing piece of history!
Many thanks to Roger Wagner which helped me with his book Assembly Lines: The Complete Book to understand the 6502.
Also many thanks to Fabien Sanglard for providing a really good review of the PoP code, which helped me a lot to get into the code.
The 6502 CPU on the Apple II
The Apple II is powered by the MOS 6502 CPU, which can also be found on the Commodore C64 and the Nintendo NES (MOS was later bought by Commodore in 1976).
The success of the 6502 was mainly achieved because it was quite cheap. Back then, the 6502 only cost $25. In comparison Intel's 8080 has cost around 250$.
One reason that the 6502 was so inexpensive was that it needed only 3510 transistors. It’s less than half the number used in its key competitor the Zilog Z80 which used 8500 for comparable (or sometimes worse) performance.
One way that the 6502 managed to keep the transistor count low was its sparing use of registers. It had a single eight-bit accumulator, two eight-bit index registers an eight-bit stack pointer and a sixteen-bit program counter.
Compare that with the competing Zilog Z80 with 8 eight-bit registers and 4 sixteen-bit registers.
Why has the 6502 performed so well with so few registers?
It could quickly access the first 256 bytes of memory (called page zero as the first byte of the two-byte address would be zero) using instructions that only needed one byte to specify the memory location.
The same trick could be applied to the stack, which is located right above page zero in the so called page one as it is addressed from $100 to $1FF . This means that the stack pointer also only needed a single byte, to address this part of the memory.
The 6502 had only 56 instructions, which are also less than it's competitors. But it used a trick to compensate that, by using different addressing modes for multiple instructions which expand the possibilities, with so few registers.
More about the 6502 can be found on this amazing blog post.
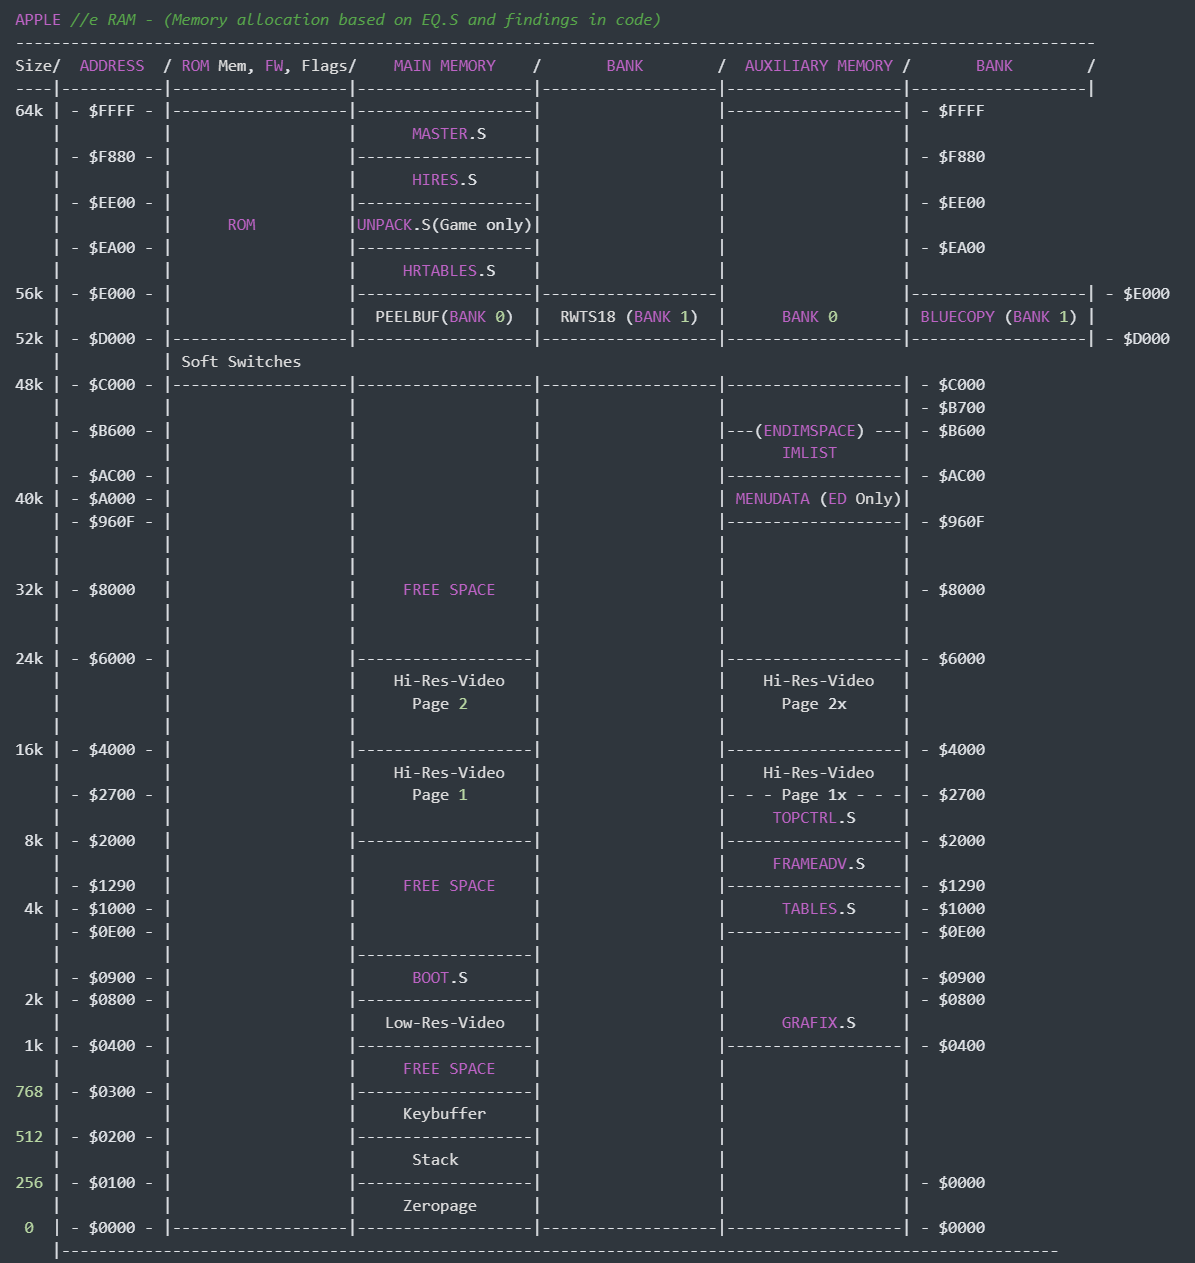
Connection to memory
The Apple II had by default a maximum memory of 64 KB RAM. Because the CPU only can address up to 64KB. Therefore the successors //e and //gs used another trick to address up to 128 KB of RAM by shifting RAM Banks.
The memory range from $C000 to $CFFF was reserved for soft switches, which allowed to switch between memory banks and different hardware, when set. Because this was reserved the missing 4k of RAM at this location could be switched with the memory at $D000 to $DFFF (Bank 0 and Bank 1).
The same switching was possible with the Auxiliary memory and with the ROM.
But it was not only a simple switching between memories. The soft switches could be set to enable read and/or write on a specific part of the memory.
Additional hardware was also accessed trough the memory as it was directly memory mapped. For example there are different video modes with different resolutions and colors, which could also be set using soft switches.
Overview of the Memory Map
Now let's begin with the code from Prince of Persia.
How the files are structured
The Game Engine is made of numerous .S files. Back in the day this was one of the ways to structure code, but also you where limited somehow in the file size of such files, as of available RAM.
All these .S files contain a ORG directive which allows the Assembler to know where will the files be loaded into RAM.
There are some files which hold some references in form of constants. These are used to reference different parts of the program or the data.
Most of the files include such reference files at the beginning:
 lst
 put EQ
 lst
 put GAMEEQ
 lst
 put SOUNDNAMES
 lst off
They also include numerous jmp directives at the beginning right after the ORG directive. And this is important for referencing with multiple files. They are the direct reference to some label in the code right after.
A JuMP instruction needs 3 bytes in memory, which means that the next jmp is located right after that in memory. Example how it look like in memory in comparison to the ASM code itself (right):
                1           org $400
0400: 4C 0C 04	2           jmp GR
0403: 4C 0E 04	3           jmp DRAWALL
0406: 4C 10 04	4           jmp CONTRL
0409: 4C 12 04	5           jmp VERSION
040C: EA        6   GR      NOP
040D: EA        7           NOP
040E: EA        8   DRAWALL NOP
040F: EA        9           NOP
0410: EA        10  CONTRL  NOP
0411: EA        11          NOP
0412: EA        12  VERSION	NOP
0413: EA        11          NOP
0414: EA        11          RTS
The ORG directive instructs the Assembler to start at memory location $400. In this code there are multiple labels like GR on line $040C.
The JuMP directive is 4C as HEX in memory followed by the line number (2 bytes - Little Endian order) which it is referring to. For example the first jmp is referring to GR on line $040C.
The advantage of such jump blocks at the start is, that they always keep the same address in code even if there are changes in this file. So it will be easy to jump from another file to a function that has been programmed in another file, by simply refering to a specific fixed place in memory.
And there comes files like the EQ.S into the game. This is some part of it:
    grafix = $400

    dum grafix          => Instructs the Assembler to start with label values at a given index of $400

    gr ds 3             => Therefore the label `gr` starts at $400 and reservse 3 bytes of memory
    drawall ds 3        => then `drawall` must be at $403 and reservse 3 bytes of memory
    controller ds 3     => $406 + 3 bytes
    ds 3                => $409 + 3 bytes
    saveblue ds 3       => $40C + 3 bytes
If you then referring in a different file to gr with a Jump to it, the Assembler would know, based on a file like EQ.S that the jump must go to memory address $400 and on $400 is another jump that finally brings us to the function of that specific file.
There are also jmp's that directely point to a specific location whithout the use of labels.
So if you want to know where a Jump is pointing to, you might need check multiple files. But most likely (today) you also can find the function by using a search function over multiple files in your editor/IDE or by using something like grep in your terminal.
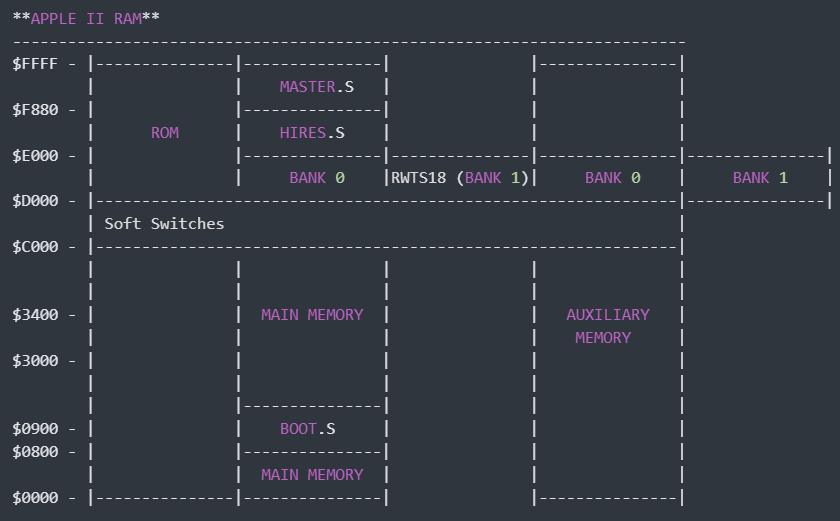
Boot - First boot up from disk
The Apple II starts to load the fist sectors from the disk into the RAM Register $0800
This part is located in the file BOOT.S
**APPLE II RAM**
----------------------
$FFFF - |
        |
        |
        |
        |
        |
        |
        |
        |
        |
        |
        |
        |------------
        | BOOT.S -
$0800 - |------------
        |
        |
        |
        |
        |
$0000 - |
This is established by outputting $01 to the instruction stream (line:21). This will trigger the Apple firmware to automatically load one sector from track:0 to the RAM at $800 and branch there.
The boot is first setting some essential soft switches (e.g. clear display, display text mode, setup RWTS16) at line:31. And then loads the rest of BOOT.S and RWTS18 into the RAM. Therefore it uses the ROM routine RWTS16 of the Apple II to load a bunch of sectors to RAM using skewing table table (line:79).
The skewing table is used to access the sequential sectors of the disk with a technique called Interleaving.
From Wikipedia about Interleaving:
In block storage devices such as hard disk drives, interleaving is a technique used to improve slow system performance by putting data accessed sequentially into non-sequential blocks, typically sectors.
Interleaving was used to arrange the sectors most efficiently, so that after reading a sector, time is allowed for processing, and then the next sector in sequence is ready to be read just as the computer is ready to do so.
Hardware Check
Prince of Persia requires the full amount of 128 KB of RAM to run. Therefore it checks right at the beginning if the Auxiliary Memory exists, which is usually the case on the Apple //e and the //gs (e.g. line:113 and line:167). This is achieved by writing, reading and comparing the data from the main and aux memory. If the aux memory does not exists then the data failed on the comparison.
Read Write Routine RWTS18
At the startup the BOOT.S is also loading a custom disk read/write routine which is called RWTS18. This routine is later be used to load the other sectors from the disk. The RWTS18 routine uses larger sectors/tracks as the original routine of the Apple II, which helps to manage and store a bigger amount of data, as there are less unused space left with this approach.
After the routine is set up it will load several data into the RAM and finally it jumps out of BOOT.S to RAM address $EE00 (line:138).
This address can be found at the start of the file HIRES.S.
HIRES.S directly jumps to to $F880 at beginning (line:13) which again is the start of MASTER.S
Master - Main routine that handles the start of the game
We are now at the start of MASTER.S were we directly jump at the beginning to the Firstboot routine at line:186.
From there on it get's complicated as the program will load a lot of necessary data for the later game. And it is not easy to understand of what is exactly loaded without reverse engineering the disk sectors. But that is not trivial because it will become clearer what some of this data will be, later on.
So several data fragments are loaded:
- Hires tables/code into RAM from
$E000to$ED00from disk via RWTS18 (line:186) - Permanent code & data from disk via RWTS18 (Loads as much of Stage 3 as it can keep)
- into AUX RAM from
$0400to$2700which is GRAFIX.S & TOPCTRL.S (and maybe more?) (MASTER:line:207) - some parts into MAIN RAM (MASTER:line:1095)
- Load aux l.c. stuff (tracks 19-21 & 34) (includes music set 1) into MAIN RAM and moves it then in AUX RAM (MISC:line:152)
- into AUX RAM from
After the loading is finished the disk drive will be turned off. And the program checks if the Hardware is a //gs which has specific display settings for Super Hi-res images (MASTER:line:215 & GRAFIX:line:2015).
The game has two modes. One is the builder which builds the levels of the game and the other mode is the game play itself. Some parts of the program are only present in memory while one of these modes are active.
The game then initializes some parts of the Hardware, like for example that it centers the Joystick (GRAFIX:line:1232).
And some basic variables (which are basically memory addresses) (TOPCTRL:line:223).
The sound will then be activated (even though it will not yet play any sound) and we are jumping directly into the so called Attract mode.
The game finally starts
The Attract mode is a self playing start of the game which is like a demonstration mode intended to attract potential players (MASTER:line:687).
First of all the music is turned on by storing a 1 in a register above $300. But it will not play music yet as this register is not mapped to some sort of hardware. But it might be interesting to know that registers around this address might have later on something to do with music or configuration.
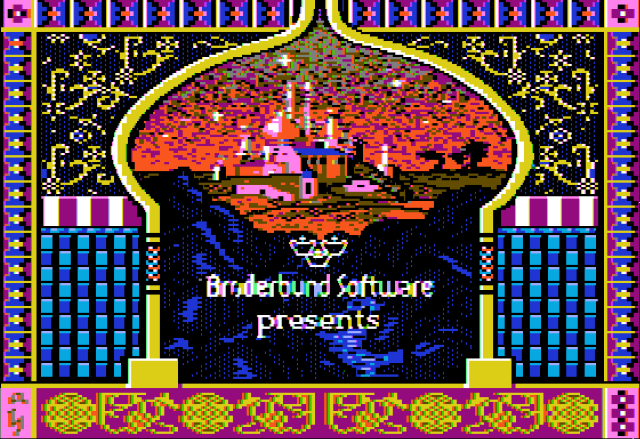
The game will then setup the screen for double hi-res by setting some Soft switches (UNPACK:line:627) and loads lots of the data for the first stage of the game (MASTER:line:1168), as well as music data (MASTER:line:1180).
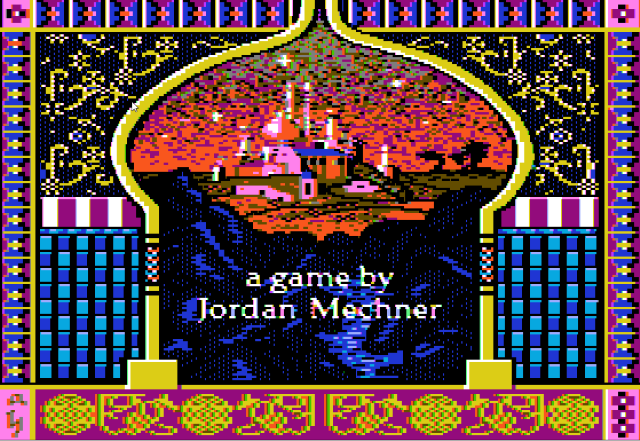
It then moves data to the area were the double hi-res screen is mapped to to finally show as this image:
Also the music finally starts playing in a interruptible way, which is interesting!
It reads the previous loaded flags which hat activated the music/sound (MASTER:line:1389)
- While music is playing, it checks for a keypresses (MASTER:line:1389)
Escto pause,Ctrl-Sto turn sound off (which also toggles the previous flags for the music)- Return A = ASCII value (FF for button)
- It uses a sound library called Music System II by Kyle Freeman to play sounds (MSYS II)
After that the screen get's cleared again (MASTER:line:764)
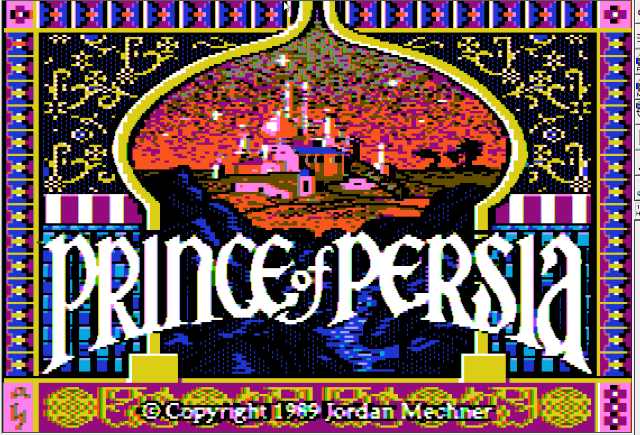
Now it will shows Author Credits "A Game by Jordan Mechner" and basically the same happens as in the previous step:
The same happens again for the next image:
After the credists are shown, it starts to play the prolog 1
It does seem to decide to load Hi-Res images based on memory locations (MASTER:line:100), same for music (MASTER:line:116)
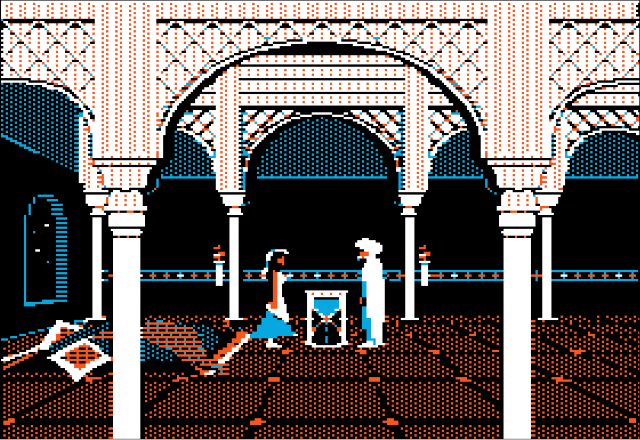
Which starts with the Princess Scene:
After that the Prolog Part 2 starts - which works similar as Prolog 1. Followed by showing the title again but without additional music.
Finally a demo game play can be seen. And all this will now loop over and over until a key is pressed to interrupt the demo, which then will start the game.
In my opinion, from this point on it's no longer particularly exciting to dig deeper, because from now on the game will always load new data and react to user input, etc. You can do this if you want to understand more, but it will be a very time-consuming undertaking. You have to know that the development of this game took around 5 years - which basically means that the reverse engineering can take much longer.
Related Links
Code
- Original Code Repository
- My Fork with additional comments
Related Software
- AppleWin - AppleWin is a fully-featured emulator supporting different Apple II models and clones
- CiderPress - Disk Image Utility (To create and Manage Apple II Disk Images)
- Merlin Pro Assembler v2.43 - Assembly Editor with both ProDOS and DOS 3.3
- Merlin Pro Assembler v2.47 - Assembly Editor with both ProDOS and DOS 3.3 (Newer GUI of Editor)
- VS Code Extension for Merlin 6502 ASM
Related Documents
- Merlin 8/16 Manual - TEXT Manual on how to use Merlin
- Merlin 8/16 Manual (Newer Version 2.45+) - Manual on how to use Merlin
- Assembly Lines: The Complete Book - Programming Guide to 6502 on the Apple II
- Apple DOS 3.3 - Tipps und Tricks - Hilfe rund um Befehle in Apple DOS (German)
Related Videos
- Quick Introduction Apple II Assembly Programming with Merlin on AppleWin - Getting Started - Simple Introduction on how to set up AppleWin etc.